Better Late than Never: Annie and Greg’s Wedding

Since I downloaded the free trial of Photoshop CS5.5 for Mia’s Christmas portraits, I’ve been editing the other pictures I’ve shot in RAW recently. This post is for Annie and Greg whose wedding took place back in September. They were the next set of photos to get the Photoshop treatment on my list.

One of the difficulties of shooting at this wedding, despite its absolutely picturesque location, was the lighting during the ceremony. It was heading into the late afternoon when the ceremony began. The sun was setting behind the house that was to house the reception afterwards. The ceremony took place in the front of the house, so half the wedding party was in direct sunlight while the other half was in shade. Not impossible to photograph, but I’m glad I switched right away from JPEG to RAW. That made it much easier to deal with the lighting scenario.

After the ceremony the wedding photographers took the happy couple down to the rocky shore for their wedding photos. I couldn’t resist, so I popped on my Sigma f/2.8 70-200mm lens and shot from a distance. Considering how far away I was and that the poses weren’t meant for me, I don’t think they came out half bad.

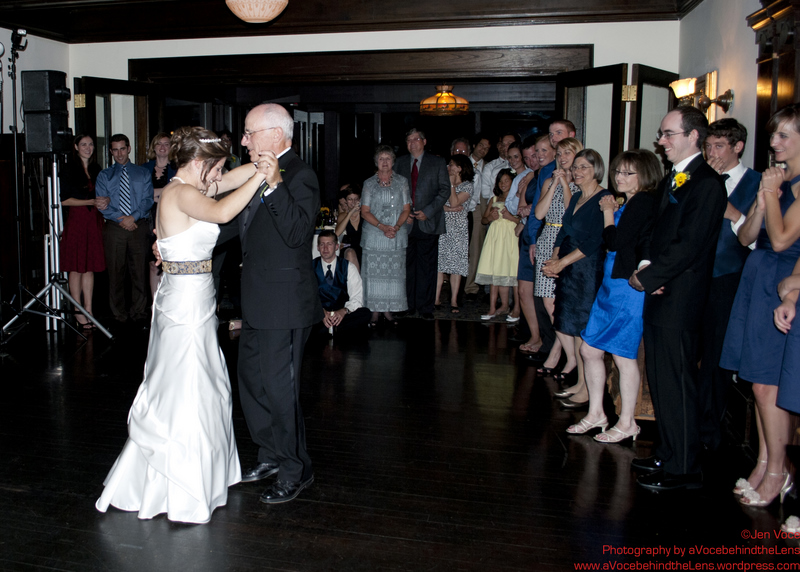
The cottage where the reception took place was beyond charming, but incredibly dark. The flash wasn’t enough for the first dance, and it was hard to get a decent view behind the rest of the bride and groom’s guests. I did my best, and once again RAW came in handy! I could lighten the photos and adjust the colors as much as necessary to bring the true scene to view. I could even dull down “noise”! 🙂

Otherwise the highlights included a fantastic view, hanging out with great friends, being carded by the wedding bar at the age of 26, and dancing! Enjoy the photos, and congrats again to Annie and Greg!

An Ultimate Way to Spend Veterans’ Day: North Shore Invitational

Growing up on Long Island pre-21st Century, Ultimate Frisbee was a gym class and nothing more. Eight years after I graduated, I witnessed my first high school Ultimate tournament on Long Island (and, now that I think about it, the first tournament I’ve ever seen on Long Island). The club team of North Shore High School, located in Glen Head, hosted the North Shore Ultimate Invitational 2011 on the 11th of November. The games were played on three beautiful fields at North Shore Middle School on a chilly, slightly windy, yet gorgeous day in Autumn.

North Shore High School’s Ultimate started as a casual Friday afternoon activity some umpteen years prior. About five years ago, it blossomed into a high school club team that meets every Friday afternoon. This year, there are 15 students in the club. Currently, the North Shore team is co-coached by Patrick Cassino, Andrew Cross, and Juan Cifuentes.

The tournament was originally scheduled to take place the weekend before Halloween, but a nor’easter pushed the date back, for better or worse, to Veterans’ Day. The clubs that were able to make the trip were mostly from New Jersey: Watchung Hills High School, Columbia High School, Westfield Ultimate Frisbee Club, and Manalapan High School. Stuyvesant High School was the other New York representative.

Photographing Ultimate is always fun, and I was definitely looking forward to photographing my first high school level tournament. The reason being is they’re in high school and they have the means to learn and grow. For someone who didn’t develop an appreciation for the sport until college, it’s exciting. I like seeing the love for this sport spread, and the fact that it’s finally happening here on Long Island is wonderful. Also, photographing for a high school tournament means the schools may want some photographs I’ve taken for their yearbook. Parents, coaches, and students may like what they see so much that they’ll let me know when their next game/tournament is (Shameless self-plug). Hooray for networking!

Also, an important note from Michaelangelo: If you find yourself with free time the Sunday after Thanksgiving, I suggest you head over to the 4th Annual Stuyvesant Benefit Hat Tourney. This year, in addition to supporting the Stuyvesant HS boys’ and girls’ teams, a portion of the proceeds will go towards the development of NYC’s first Youth Club League. This league will allow players from all across the city to participate and receive coaching from elite club players. Next summer, the best players from this league will form a team to represent NYC and compete in the USAU’s Youth Club Championship in Blaine, MN. Help promote youth ultimate!

AND if you’re one of the parents, students, or coaches that attended the tournament, please e-mail me at jennifer.voce@gmail.com for the link to the album!

A Flare for Wedding Photography

It finally happened! I got PAID to photograph a wedding!!! I was the second shooter for my good friend, Matt Turri, at a wedding this past weekend in Brooklyn, NY. I had asked him a few months ago if I could tag along as a sort of apprentice so I could build a firmer understanding of how a day goes for a wedding photographer and so I could see a pro in action.

Like I said, the wedding took place in Brooklyn, NY. What I didn’t say was that the ceremony was held in a chapel. The chapel was in a cemetery. Yes, I thought that was an odd choice until I learned a little bit more about the chapel and the cemetery it sits in. Green-Wood Cemetery, founded in 1838, actually rivals Niagara Falls for title of “country’s greatest tourist attraction”. With 478 sprawling acres of natural beauties, it was no wonder the cemetery quickly “became the fashionable place to be buried”. These days the site is visited for those gorgeous views and the history the graveyard holds. The chapel, I was informed by one of the grooms, was actually built by the same people who built Grand Central Station, Warren and Wetmore. Check out the Green-Wood website for more information on its history and how to take a tour of the grounds.

As the second shooter, I had a lot more flexibility to photograph artistically, rather than typically, what I saw during the ceremony and reception. Matt would pose the couple, or group, the way that he wanted to for the photograph he saw. I used the opportunity to walk from one side to the other, photographing the same shot at different angles. I rarely found anyone looking in my direction, which meant I obtained more candid-looking photographs.

Matt Turri actually took the time to teach me how to photograph sun flare! This was great, as I had always wondered what it takes to turn a regular sun into a brilliant star. “It’s your f-stop,” Matt told me as we photographed the chapel before the wedding began. “You need your f-stop to be at f20 or f22 for a really good flare.” I have to say I am proud of the way the sun bursts in some of the photographs, but confess a lot of the extra color and circles of light are from the dust my camera has been accumulating. I’m guessing that’s my cue to learn how to properly clean my camera, and then blog about it 😉

Thanks again to Matt Turri for making me his second shooter, and to Lawrence and Robert for allowing me to blog about their special day! Enjoy! 🙂

p.s. Each “Matt Turri” is actually a different link to something about him on the web. Please feel free to click and peruse them all!

Zodiac Tournament 2011: What’s Your Sign?

An Ultimate tournament not to be missed by players everywhere is the Zodiac Tournament. It is held in Rochester, NY (GRADA) and Toronto, Canada (Toronto Ultimate) on alternating years. I had wanted to attend last year but the trip to Canada was too much for me, so I waited until the tournament returned to Rochester in 2011 and I can most certainly say that it was worth the wait. Unlike other tournaments, each team is built around one of the twelve Zodiac signs. Your sign determines your team as long as there is space. To compensate for the tournament’s growing popularity, two additional teams were created: Sun and Moon. I managed to grab a spot on my sign, Gemini.

Photographing with the sun behind your subject, especially on a sunny day, isn’t the best idea. I say this because what you end up with in your photograph is a stark contrast between your subject and your background. Your subject isn’t lit by the strongest light source in the area and therefore the colors will be dark and the features will be blurry/”noisy”. On top of that, your background is washed out, and your sky will more than likely come out as white rather than its true blue hue (I love unintentional rhymes). I’m going to blame my inability to make this distinction on the field on my lack of sleep. It took 8.5 hours to drive from Long Island to Rochester the night/morning before the tournament. If you can afford it, fly to tournaments. Your body will thank you.

Although it has little to do with photography, I needed to share how to remove temporary tattoos. Why? Because after this tournament I had four of them (two inches by four inches) on my arms and a wedding to attend the following weekend. There were a few websites that claimed olive oil was the answer, so I put it to the test. I applied the olive oil to a piece of paper towel and also to my arm and started rubbing. At first, it didn’t look like anything was happening, but that soon changed. I had one of the tattoos removed in under five minutes with little to no redness left behind. If you’re still sporting your Zodiac temp tattoo and don’t know what to do, I suggest you break out the oil.

For more on all things Ultimate and details about Zodiac 2011, check out HighReleaseHandler’s Blog!

p.s. If you weren’t aware, I’m now on Facebook! Like “Photography by aVocebehindtheLens” and stay updated about posts, pictures, and the like 🙂

All I Want for Christmas is Photoshop

This fall, I was employed as a night-time industrial photographer at a testing facility out on Long Island. One of the perks was access to Adobe Photoshop CS4. Up until this moment, I had only heard of Photoshop’s greatness and seen the amazing things it can accomplish. For the position, I learned some basics from my coworkers and my supervisor:

  • Inserting Text
  • Cropping
  • Adjusting Underexposure/Overexposure

That was all well and good, but I knew I had barely scraped the surface of Photoshop’s potential. I went down to the library and took out Photoshop CS4 All-in-One for Dummies and began reading. This wasn’t a good method for me for two reasons. When it comes to learning, I find I retain more by throwing myself into something and just doing it. For some reason when it came to learning Photoshop I wanted to know everything there was to know and then try my hand at it. I think I didn’t want to somehow ruin the photos I had taken or edit them one way and find I would have rather done it this way. Secondly, I only had the book for a limited time and it wasn’t mine. I couldn’t mark up the margins or leave torn bits of paper as bookmarks or refer to it later. To remedy this fact, I began writing important points in a notebook which is good since I can keep that. However, since I’ve yet to take an actual photo class (I’m crossing my fingers for this summer) and hadn’t really explored Photoshop as much as I should have, the directions and jargon were over my head. I felt overwhelmed. So I gave up on reading the book and returned it ten days late and only 150 pages in and went back to my favorite method of learning: asking.

Let me just say that there’s no way to start editing your photo and ruin it because of something amazing I need to share right now. It’s called “layers”. You have the original picture and then to edit you create a layer. You can create a layer for everything you do if you like. If you’re not happy, you don’t have to scrap everything you’ve done up to that point. All you have to do is delete that layer, or use the history tool bar to go back a step or even back 20 steps! It’s like Photoshop knew I would be slightly neurotic about my pictures and made this method just for me! Thank you, Adobe!

I’ve set this post up a bit differently from the last ones in that each picture will have a before and after. With each photo, I do my best to describe the method by which I edited and will include the video (or videos) by which I learned something new! If you’re looking for further info on how to bend Photoshop to your will, either use Google to search for videos and tips or check out Adobe’s Online Support system.

Autumn Explosion

With the world looking dreary once again, I thought I’d help make it colorful with a fall themed post! The colors of autumn in the Northeast always put a smile on my face. I had a chance to spend a weekend in November with some friends from college in Rochester, NY. Shockingly enough, it didn’t rain the entire weekend! Only part of it. On the day it didn’t rain, it was the complete opposite of typical upstate New York weather. For all of you who don’t know what it’s like, think of the weather typically found in Seattle and London, but more snow. On this particularly beautiful spring-like day, we set out for a walk around Highland Park which is best known for its yearly Lilac Festival.

Even though it was the end of fall, the trees had managed to hold onto their foliage just for me, very thoughtful. We found an area full of Japanese Maple trees with some of the greatest color around! When it comes to capturing autumn colors, I don’t think there is such a thing as “too many photos”. Go to town! On the Nikon d60, I like to set my color to “Most Vivid” and not “Black and White” for obvious reasons.

I played around with focus points. One of the most frustrating things about my d60 is is only has three focus points, so you don’t always get what you want. For that reason, I took the same shot and had the focus point at different places. With an f/3.5, different leaves came into perspective or were lost which looked interesting. I picked my favorites from the day. Let me know what you think! Enjoy! 🙂

Flashes of Happiness

Over a month ago, two of my very good friends were married at the Swan Club. After the wedding I’d attended the month before (see So Happy Together), I was excited about applying the knowledge I’d gained from my last wedding to this one. There were a few differences between the two weddings, but I found what was most difficult for me was the lighting. The flash I use is the internal one on my camera, which is fine if you’re close. Put the subject at the end of a long room and forget about it. Luckily, the photographers and I seemed to have similar timing for picture taking and I have quite a few photos that caught their light source, saving my photos. The photos without this light source are absolutely riddled with noise. It’s just another reason why I’m looking at purchasing a Nikon Speedlight (see The Hat’s Where It’s At).

It’s taken me a while to edit the photos because I accidentally took them all in RAW. There’s nothing wrong with RAW. In fact, it’s the closest thing to a negative that digital has to offer. What’s difficult about it in my case is I’ve yet to purchase an editing software that supports the changes I can make with it — ridding my photos of the exorbitant amount of noise, and bringing up the brightness and color without washing out the photo. Why? Because it’s crazy expensive. Fortunately for me, I now have access to Photoshop CS4 which I’ve been reading up on so that I can improve the photos in this post. Reading Photoshop CS4 for Dummies is taking a lot longer than I expected though. Rather than keep these photos from the world any longer (or mostly just the bride and groom), I thought I’d put them up now. The edited shots will come, but for now, enjoy!

The biggest difference between a RAW file and a JPEG file is the following very pertinent information. Every time you save a JPEG file, it condenses itself, which eventually distorts and damages the image, whether you’re copy-pasting or editing and saving. RAW is considered “lossless”, as the information that was originally there stays that way. The file never tries to downsize itself, so time or editing or saving cannot harm it. The editing software I own is Picasa, which is free and easy to learn for JPEG but less than useful for RAW, especially when Picasa tries to save your RAW photo changes at JPEGs. Either way, it is a good idea to make a duplicate of your files before you begin editing.

The Hat’s Where It’s At

With the fall season coming to a close, ULTiNY held a final tournament on Randall’s Island this past weekend. It was a Hat tournament for all of those who had signed up for the season to come and play on Saturdays and was even open to those who hadn’t for $15. With enough people for four teams plus subs and great though cool weather, it proved to be worth my while. Three of the teams were comprised of the weekend league while the fourth team was from Hunter College. They had just started to develop their Ultimate team and played in the Hat tournament as one team to help develop their skills in real game situations. For more details on this Hat Tournament and all things Ultimate, check out High Release Handler’s Blog!

The Hat tournament was challenging for me in a number of ways. I had a chance to play with and against people who weren’t on my normal team which forced me to push my level of play. It also turned into a day where one moment it would be sunny and bright and the next it would be cloudy and dull. I kept having to switch my ISO up and down in order to maintain the f/stop I preferred and a shutter speed quick enough to eliminate blur and slow enough to prevent overexposure.

The next Ultimate tournament I’ll be playing in will be held in Pittsburgh, Pennsylvania. It’s called the First Night of Flight, and is an indoor tournament that takes place at the beginning of January. The reason I bring it up now is because I need to purchase a flash. I’ve been looking at the Nikon brand ones, having been burned by third party camera equipment for batteries. The two that I’m most interested in are the Nikon Sb-600 and the Nikon SB-700. The SB-700 (2010) is basically the replacement model of the SB-600 (2004). Some of the differences are in favor of the SB-700:

  • When photographing with multiple lights, the SB-700 can act as the master flash while the SB-600 can only be a slave light
  • SB-700 comes with two color correcting filters
  • SB-700 can rotate almost 360 degrees
  • Flash reaches farther (120 mm versus 85 mm)

There are, however, some great selling points for the SB-600:

  • It’s about $100 cheaper: while the Sb-600 can be found for $220, the SB-700 is around $330
  • It’s smaller and lighter, which is perfect for me since I have little arm strength left to give while playing Ultimate
  • Works with film and digital cameras, compensating for either or

It’s down to these two! If you have any advice, I’d love it. I know people who have the SB-600 and are more than content, but then again the SB-700 is new. For more on these two flashes and also the SB-900 (which I currently can’t afford), check out this website!

All The Single Ladies

It is a truth universally acknowledged that a single woman about to unite with a single man in holy matrimony will be thrown a bachelorette party by her friends. At the end of October, such an occasion arose. Before my friend tied the knot, a party bus full of her friends dragged her to a few wineries for a day. Our stops included Duckwalk, Macari, and Baiting Hollow Farm Vineyard. I debated about whether or not to bring my camera with me. I figured a bus full of girls + lots of wine + bumps in the road = wet camera, and everyone knows wet cameras don’t work very well. Nevertheless, I would have never forgiven myself if I had left it behind for two reasons:

  1. It’s my friend’s bachelorette party!
  2. It was my first bachelorette party.

So with camera in hand, we made our way out to the east end of Long Island.

Being that this was more of a social event, I only packed my 18-55 mm f/3-5.6 Nikon lens. I was sure to grab group photos wherever we landed, especially since the rows upon rows of grapes made for a nice background at both Duckwalk and Macari. The nicest shots of the day had to be at Baiting Hollow Farm Winery.

Upon entering the driveway for Baiting Hollow, its apparent that this winery is unlike the others on the block. Tastings took place both inside the house and in the backyard. Songs played by live musicians were accompanied by the dozens of patrons scattered throughout the backyard. At the back gate, our group was taken on a tour of the horse sanctuary. While attending the tour, I pulled out my camera and thanked myself for not leaving it behind. The horses in the sanctuary, save for two babies, are all rescue horses adopted by the family starting with the first three back in 2007. If you feel as strongly as the Rubins, check out this website to sign the petition to stop horses from being sent to slaughter houses in Canada and Mexico.

Gates of Hell-o-Ween and Back

Halloween means candy, costumes, and Ultimate here in the Long Island/New York area. Based in Astoria, the Hellgate Ultimate team hosts their annual Hell-O-Ween Tournament on Randall’s Island. It is a costume tournament, though most do not wear their costumes while they play (I can’t imagine why). Our team, the Super Cocks (as in Fighting Roosters), chose a Pixar related theme for our costumes and I don’t think they turned out half bad. For more on all things Ultimate and the Hellgate Tournament, check out High Release Handler’s blog!

If you didn’t notice, this weekend turned out gorgeous! So gorgeous, in fact, that I kept my ISO at 100 and still could shoot at 1/2000 s and f/2.8 or smaller. Lots of sun, minimal clouds, and only some wind. The problem you run into with “lots of sun” is lots of blown out photos. I made a critical mistake photographing from the opposite side of the sun. With the players between me and the biggest light source I had, I was focusing on the shadowy side of people’s bodies. This would leave half of the person so bright you barely registered their facial features, especially if they were light skinned. Sadly, the reason I couldn’t really move from that side of the field was because I was playing. More on that in the next paragraph.

Shooting sports when you’re playing is tricky. There’s the fear of leaving your camera in the wrong hands with someone who’s only handled a point and shoot or a CVS-brand 35 mm disposable film camera all their lives. Best thing to do when you’re on a sports team is to find the other camera nuts. There are a few people on my team who know what to do and others I have taken the moment to show before running onto the field. Second option is to put it underneath your sweatshirt in the hopes of it not being trampled. Scope out a space a few feet from the line (6-10 ft.) and deposit. Third option is to take your camera apart and place it back in your bag and take it out again every time you take a point. I usually go with one and two. Three is kind of a hassle.